Showing posts with label shelves. Show all posts

Tuesday, May 19, 2009

shelves - the hanging

Wow.  Sounds like we took a hangman's noose and just ripped 'er loose, doesn't it?  

Well, as it turns out, hanging those dadgum shelves was the hardest part about creating them.  

Dana had just arrived an hour earlier, literally, but we welcomed her by cramming her, along with Cookie, Wrangler Sarah, and me into the tiny bathroom.  

I started by looking for studs.  Yes, I know, I am ALWAYS looking for studs, but I was looking for the ones in the wall, this particular time.  And I am proud to say that my ear picked up the first one, via knocking, right away.  

The second, third, and fourth time, however, I missed.  Finally, by the fifth try, I had Sarah go get the stud finder, because I was failing miserably, even with measuring.  

As it turns out, on this ranch, studs are here, studs may be there, or studs may not be at all.  Neither Dan, nor Ellen, were surprised that I couldn't find one where there SHOULD have been one.  And there was only one.  So I REALLY hope that shelf holds.

I was using a small drill bit, which Dan bought for me since I broke the other two.  And it was really hard for me to get the screw in without spinning the drill, so Cookie took over for me.  


This is her concentrating face.  

And by the way, she is putting her foot on the sink counter to get enough force to put the top one in, so it's not that I'm just a wuss.  I mean, that is part of it, but not all of it.  


Wrangler Sarah is only smiling because I told her how to hold it more easily.  She was sweating 2 seconds before that.  


Dana is our camera woman, so you're not seeing her, but this is Cookie finishing up the job.


And this is my idea.  Come to fruition.  In all its glory.  

It makes me smile every time I go into the bathroom.  

Monday, May 18, 2009

shelves - the process

As I mentioned yesterday, I'm going to show you how I created my bathroom shelves.  

Before we get started, I want to acknowledge everyone who helped me.  I already mentioned my parents.  Wrangler Sarah and Cookie did some holding.  Dana directed the leveling.  And finally, these guys were there, every step of the way.  

That's Selene looking at you and Curly scratching her booty.  I call Curly #2, because that's what her ear tag says. 

Ahem, so as I was saying yesterday, I built these shelves around the crates.  So I started my measuring there.


I found two long pieces of pressboard, which made me happy, because that means our shelves are smooth, instead of giving us splinters.  Lord knows we get enough of those as it is!


With this length, I was able to cut 5 shelves (including the top and bottom) into 19" pieces with the circular saw.


I cheated with this picture.  I was cutting the sides, because I forgot that I was going to blog this.  You can see the shelves behind my leg.
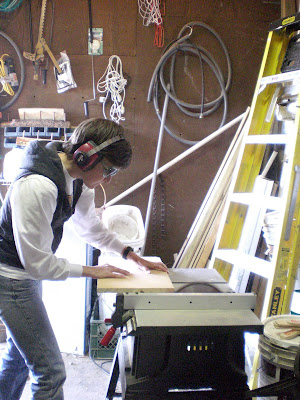

Then, I took the shelves down to 18" using the table saw, so that I could square it off better.  (Cam, you notice the safety glasses?)

However, please keep in mind that I'm having to freehand because on 4 of the 5 pieces, neither end is square, so I couldn't use the guide thingy on the table saw.  
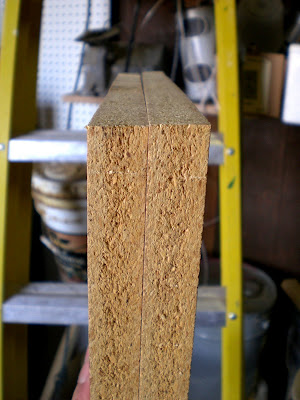
Which means you come out with pieces like this.  Slightly uneven.

But once I got all 5 pieces, I made sure that they lined up.
  
Again, I'm doing some post-editing.  You'll notice this picture only has 4 shelves.  That's because I originally planned on leaving it open-topped, but Wrangler Sarah assured me it would look better closed.  I agreed.  

Once all my pieces were the same length and squared to the best of my ability.  I cut two side panels to be 40", so that the shelves would all be 10" apart.  Apparently most hygiene products are 9" tall...who knew?

I pre-drilled holes...  


...and screwed the shelves to one side.

Then I laid the other side panel on top.

Of course, Selene was supervising.

Screwed it to the bottom shelf.


And...

Uh. Oh.  

So, um.  Hey, LeAndra, remember the part of the email where Dad said "EXACTLY even?"  Whoops.

Oh yeah.  Did I forget to tell you that I broke a drill bit in one of the shelves?  And, um,  I decided that it was ok for it to stay?  Yeah, well it wasn't ok.  It was making my shelves uneven.  

Luckily, Dan pulled it out with his pliers while inspecting my work, so I was again along my merry way.  And I would just like to add that he is the only man who touched the whole thing and that was the only thing he did.  Thank you very much.

I would also like you to know that I did such a good job that Dan thought I made it from a kit!  Little did he know I was scavenging through his scrap piles immediately upon arrival.  

That pretty much fixed the gapping issue, so then I used a level to make sure the shelves weren't crooked when I screwed the second side on to the rest of the pieces.    

Ahem, but as you can see here, based on the middle bubble, you have to make sure the entire shelf is on even ground or it does you no good to even use the level.  

Because the shelves were still a bit wobbly and I needed a way to secure it to the wall, I added a back piece.  But, again, I'm making this out of scrap wood and I don't have any more long pieces, so I had to make 3 small pieces.  

First I had to take off the nice rounded edge, though.


And that's where the guide thingy came in handy.

To make the back panel, it was more measuring, cutting, pre-drilling, and screwing.  


Don't forget a little turkey jealousy.  They didn't want the goats to have all the fun.  

And finally....

Are you ready for this?


Voila!  The finished product.  (It's not cracked, that's just where I couldn't cut straight.)

Please hold your applause to a dull roar.  Thank you.


Sunday, May 17, 2009

shelves - the idea

Have I yet mentioned that there will be 8, yes, I said EIGHT, women sharing the 1, yes, I said ONE, bathroom?  And at one point, there will be 10, yes, I said TEN, women sharing that ONE bathroom.  

Let me show you the bathroom.

Please note the lack of storage space.  

You see this big open space above the toilet?  

That's what we, in the business, like to call wasted space.  Especially with that many women in one bathroom. 

Necessity breeds invention.

I decided we needed a cabinet in there, but something much larger (and cheaper) than what you can buy.  There's plenty of scrap wood around the ranch, so I decided to make one.

Oh yeah, by the way, I've NEVER made anything before.  Well, except for a jewelry rack for the Seester in jr. high, but I'm pretty sure I had boys do most of the work.  

Saws scare me.  

Anyhow, my dad can build most anything.  And he can tell you how to build most anything.  So I emailed him about it and he suggested I BUY a shelf.  You see?  I've never built anything.  And I suppose after plumbing with me on Skype for hours on end, he wasn't looking forward to my little project.  

My mother intercepted the email and suggested I get some sort of boxes for the shelves rather than create doors.  Brilliant!  Not only do I not have to deal with hinges, etc., each girl gets her own box!


I picked up 8 mini-milk crates from Wal-Mart for a buck a piece, then created my shelves around them.

Because I'm so dadgum proud of myself, I'm going to show you how I did it.  So, if you have AB-SO-lute-ly no interest in how to make shelves, you don't have to stop by tomorrow.  If you have only a slight interest, you may scroll through the pictures.  And if you really don't believe I did this, you can read and look at the pictures.  

Here's to hoping I'll see you tomorrow!

Yours truly,
The Shelf Wrangler